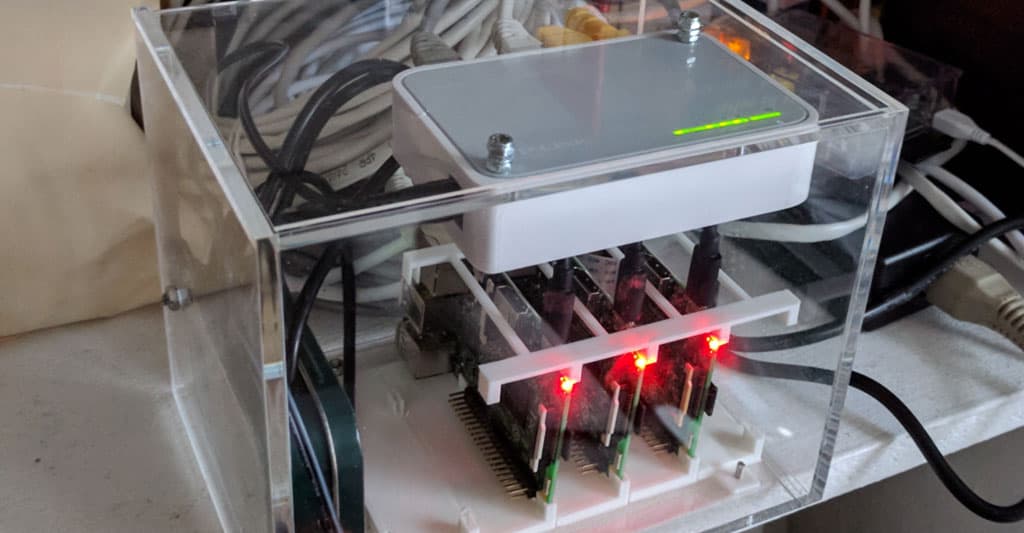
Last year I spent an embarrassing amount of time running Docker Swarm on a cluster of Raspberry Pis, and packaging it all up into a cute little box. In this article, I’ll give a quick explanation of what Docker is (an increasingly popular containerisation technology), what Raspberry Pis are (cheap credit card sized computers), and give some pointers in case you want to try building something like this.
Above is a picture of the finished product sitting on a shelf in my living room.
Containers
Containers are a tool designed to make it easier to ship applications with all their dependencies, in a single bundle. This could include library dependencies, additional binaries, configuration files, and so on. Multiple containers are usually run on a single machine, the “container host”. These containers have their own views of kernel resources such as the filesystem, memory, and other processes, so they can coexist peacefully – even if two containers running on the same machine each bundle different versions of the same shared library, or write to files at the same path.
These properties are good news for those responsible for operations – they remove some of the burdens of worrying about how multiple applications installed on different machines will interact, and make it quicker and easier to deploy new versions of an application.
It’s also good news for developers, who now control exactly which dependencies are shipped with their application. Another benefit is the ease of spinning up realistic test environments. For example, think of a typical tiered web application. There might be a single page frontend tier, a backend tier with most of the business logic, and finally a database tier to store state. Packaging the backend and database tiers as separate containers mean a realistic test environment can be spun up with a single command. No more 50 page checklists to set up your development machine before you start work and no more regressions caused by testing a change against the version of MySQL you have installed locally, rather the version running in production.
Docker was an early adopter of containers, so much so that “Docker” and “containers” are synonymous in some people’s minds, but there are other container engines available such as CoreOS’s rkt (pronounced rocket), as well as a push towards an open standard for containers.
What about Virtual Machines?
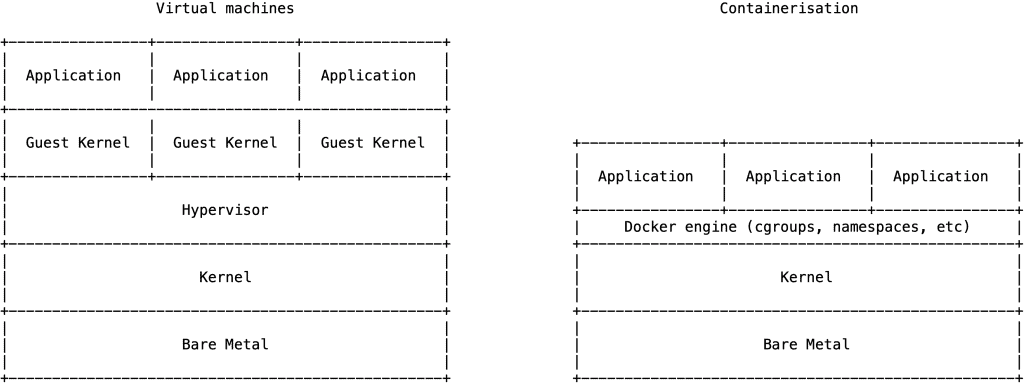
You may think that containers sound a lot like VMs (virtual machines). You’d be right in that virtual machines also provide isolation between sets of applications running on the same hardware. The difference is summed up nicely in the diagram below:

On a container host, the different containers are running on top of the same operating system kernel, and isolation is provided using various fancy kernel tricks such as namespaces and cgroups. On a virtual machine, however, the isolation includes the entire operating system. Since containers require less emulation, they are usually faster and require smaller images. There is a trade-off with safety, however – virtual machines provide stronger isolation than Docker and, perhaps unsurprisingly as Docker is relatively young, there have been some serious high profile vulnerabilities in Docker’s isolation.
Orchestration
Orchestration products like Docker Swarm look after a collection of containers. You provide a blueprint detailing which containers are required and of which type and the orchestrator will ensure that your cluster of containers matches your blueprint. Currently, Kubernetes is the de facto standard orchestration system, it has cornered the market so that even the big cloud providers like Amazon and Google provide managed Kubernetes services.
Raspberry Pis
Raspberry Pis are tiny computers – about the height and width of a credit card – which you can buy for £20 to £30. These days they come with a 1.2GHz processor and 1GB RAM, the specs you’d expect from a top of the range desktop computer released 15 years ago. Their relatively low cost and strong community make them great for these sorts of toy projects.
The problem with ARM
When compiling a program written C, Rust, Go, or your favourite compiled language, the output is machine-code designed to be run on a specific CPU instruction set, such as x86 or x86-64 – the two most common architectures these days. A machine with an x86 CPU can only run code compiled for x86, and vice-versa. Software is usually provided for download compiled for common architectures like x86, and x86-64.
Raspberry Pis use processors made by ARM which, use a different instruction set, so you’ll often find yourself compiling your code from scratch (this includes any code you want to run in a container). Or more likely, since compiling anything on a Pi takes a lot of time, you will find yourself cross-compiling – compiling code on a laptop (probably x86_64) which can run on the Raspberry Pi. Fortunately, all the programs used in my example cluster were written in Go, which is straightforward to cross-compile.
The build
You’ll need the following:
- A couple of Raspberry Pis, with SD cards.
- 5V power supply, or powered USB hub, with at least 2.5A for each Raspberry Pi (you could definitely get away with less, but 2.5A is the recommended). I used the 5V 10A switching power supply from Adafruit.
- Ethernet switch & cables.
- A case. I bought a perspex case from MUJI and the plastic rack holding the Raspberry Pis was 3D printed from thingiverse. There is also some nasty soldering hidden inside an M&S mints tin which takes a single input from the power supply to multiple micro USB plugs. If this is too much work, you can buy some pre-made Raspberry Pi cluster cases now.
Power
The USB power specifications are complex. The default is that the power supply will only promise 500mA, but if you tie together the two USB data pins then that means a promise of 1.5A. Fortunately, the Raspberry Pi schematic shows that the Pi completely ignores the two data pins, so simply wire any 5V power supply straight into the micro USB port. Alternatively you could buy a powered USB hub, as long as it’s rated for at least 2.5A per Pi.
Installing Docker
Each of these stages needs to be run on every Raspberry Pi in your cluster.
- Download and install the Raspbian Lite image on each Raspberry Pi.
- Set up a static IP for each Raspberry Pi, this is not technically required but it will make the next stages easier. If you’re doing this at home, this can usually be done on your router.
- Install Docker
curl -sSL https://get.docker.com | sh - Allow connections to the Docker daemon remotely, using TLS to do this securely
From now on you can run everything from the comfort of your own laptop, don’t forget to set the DOCKER_HOST to whichever node you want to run commands on, as mentioned in the above article.
Start a swarm
First, pick a node on which you want to start your swarm, this will be the first manager node. Manager nodes are the nodes which maintain the swarm state.
From the manager node: docker swarm init --advertise-addr. This will print the necessary command to run on your worker node in order to join the swarm – so run it on the worker and you’re good to go. That’s literally it.
What to run on your swarm
Unlike when running a single Docker host, when you deploy onto a swarm, you need somewhere to host all your Docker images before they are deployed to the swarm. This place is a Docker Registry. On the x86_64 architecture, there is an official image for that, but not for ARM, so if you want to do this you’ll need to make compile your own. This is a Go application so it’s not so complicated.
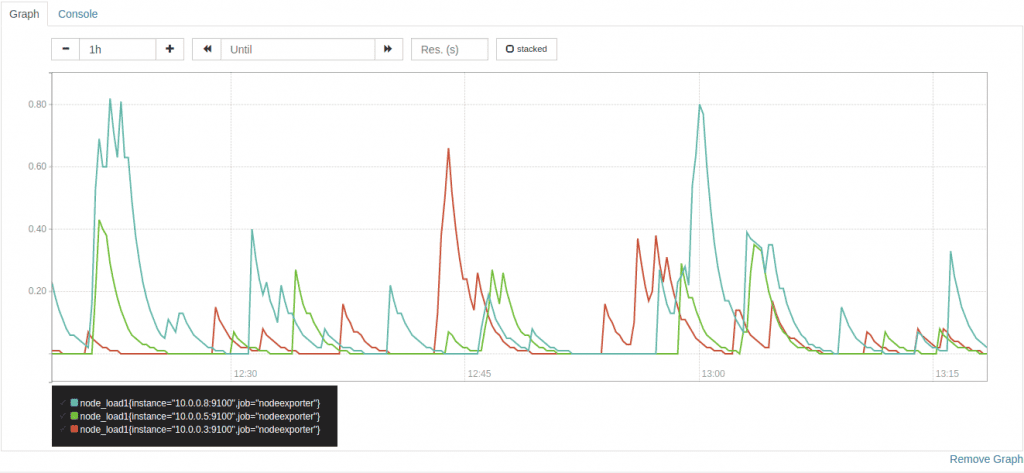
Here is a picture of Prometheus, which provides monitoring dashboards and alerts, running on my swarm:

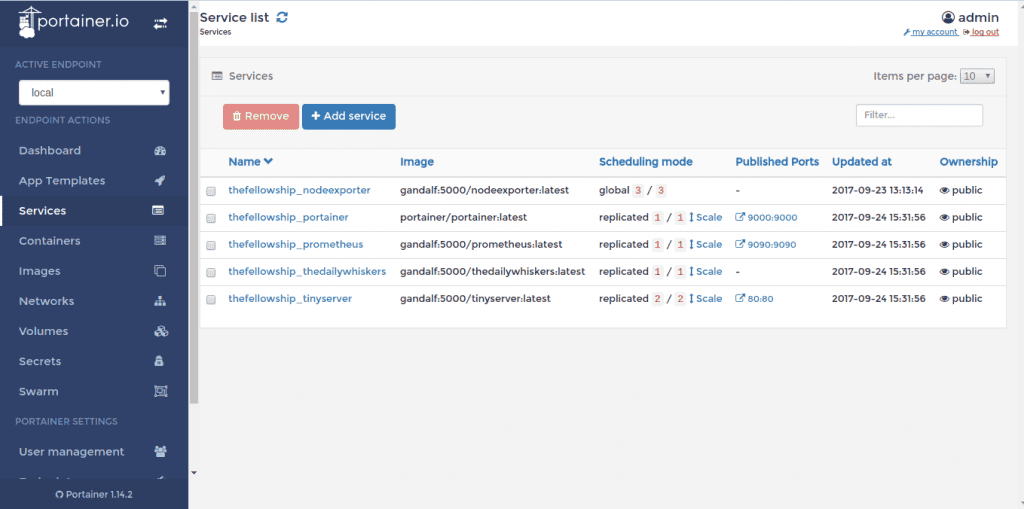
And here is Portainer, a pretty management UI:

Busybox is a bit of Software that provides lots and lots of Unix tools, including a shell, and httpd – a webserver. Since it’s absolutely miniscule (<5Mb), it’s a nice way to create a tiny web server. Here’s a great video of Hypriot using running >2000 webservers on a single Raspberry Pi with Docker.
A final note on actually deploying applications. The easiest way to deploy applications onto a swarm is to use docker-compose. This is a tool which takes a description of your applications environment – how many of each container, how they talk to each other, and so on – and runs your application. There’re no special modifications needed to run this on a Raspberry Pi cluster.
Conclusion
Setting this up was a great way to understand the ins and outs of Docker and Docker Swarm for containerisation and orchestration. Obviously, you’ll want to run your production infrastructure on more than 3 Raspberry Pis but the principles remain the same. Standardising your environments using containers and container orchestration can give you much greater ability to deliver at pace and innovate on your existing platforms.
At Softwire, we’re seeing more and more of our projects adopt container and orchestration technologies.
Contact us if you’d like to chat to us about how containerisation could revolutionise your business.
Alternatively, we’re hiring across a range of DevOps roles.


